 PDF Download
Attachment to Tractor
• Attachment of machine to tractor contains a number of transactions which require special attention and should be performed by the experts!
• While attaching the machine to tractor, make sure that there is no adult, children nor living creature exist between tractor and machine and within the unsafe limits around the machine
• Ensure that all connections are established in accordance with the relevant instructions and make sure that all security mechanisms are fixed to the prescribed points!
• Place the machine on a smooth and plain surface before attaching the machine to tractor. Stop the engine and pull out the ignition key and remove the power take-off in the meantime! Support the machine and tractor with braking mechanisms or wedges in order to eliminate sliding risk!
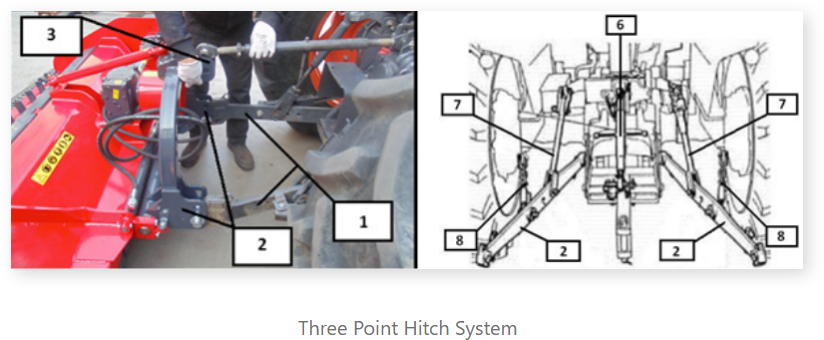
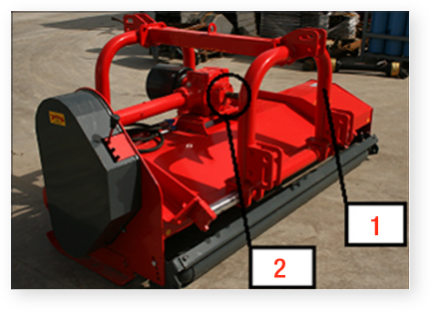
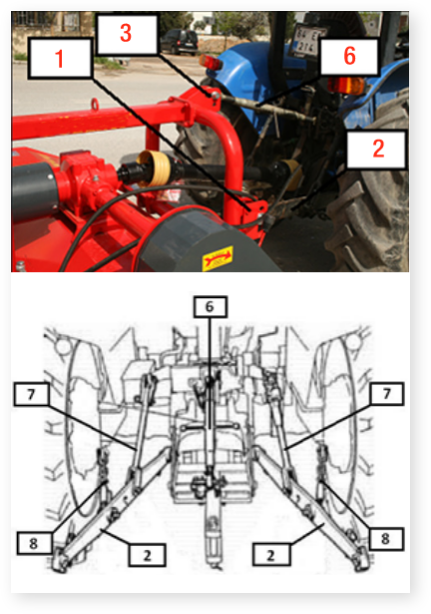
• First place lower hydraulic linking rods of tractor (1) to the connection points at lower linking rods of machine tow (2) while attaching Vertical Mulcher to the three point hitch system of tractor and fix both of them with hairpin following the safety pins
• Align left and right lines in parallel for the machine that you have connected to lower linking rods by the use of right and left hanging rods (7). (Only right hanging road is aligned in some old-fashioned tractors. They may be aligned with the adjustment rods suited on both hanging rods in new model tractors.)
• Right and left stabilizer chains (8) prevent machine or related tools from being shaken and rubbing against the tires while moving them. Loosen the stabilizer chains while working on the field; but make sure that they are loosened up to a distance of four fingers’ length!
• Place upper linking rod (6) of tractor to the corresponding hole on the upper fishplate (3) for upper connection following the lower connection of machine and fix it with hairpin following the safety pins. Upper linking rod of tractor allows aligning front and back lines in parallel for the machine attached by being shortened and extended. A gap should be available between round journals in the holes at the side where upper linking rod is connected to both machine and tractor and shafts attached to the said journals!
• Check the lighting, warning systems and security mechanisms of the machine, intended for the transport on highways and replace the missing and lost ones as well as the ones that lost its function.

• Ensure that lower and upper connections of the machine are established as recommended and make sure that vertical and horizontal lines are aligned in parallel! Don’t allow the machine to move left/right and up/down
• Choose upper and lower connection safety pins with appropriate diameters for the category of your tractor, which are used while Vertical Mulcher is attached to tractor with three-point hitch system!
• Vertical Mulcher is intended to be used for Category II. Check whether the sizes of upper and lower safety pins are in accordance with the values stated in Category II (See Table 1).

ATTACHMENT OF OPTIONAL BIDIRECTIONAL HITCH SYSTEM TO TRACTOR
• If you have a machine equipped with optional bidirectional hitch system to tractor which allows moving both forward and back (see Picture) and if tractor will be driven forward, attach the machine to tractor as detailed in section 3.2.
• If vertical mulcher with bidirectional hitch system should be operated backward, you should use second tow (1) and second PTO shaft (2) on the machine.
• First place lower hydraulic linking rods of tractor (1) to the connection points at lower linking rods of machine tow (2) while attaching your machine to the three point hitch system of tractor and fix both of them with hairpin following the safety pins.
• Align left and right lines in parallel for the machine that you have connected to lower linking rods by the use of right and left hanging rods (7). (Only right hanging road is aligned in some old-fashioned tractors. They may be aligned with the adjustment rods suited on both hanging rods in new model tractors).
• Right and left stabilizer chains (8) prevent machine or related tools from being shaken and rubbing against the tires while moving them. Loosen the stabilizer chains while working on the field; but make sure that they are loosened up to a distance of four fingers’ length!
• Place upper linking rod (6) of tractor to the corresponding hole on the upper fishplate (3) for upper connection following the lower connection of machine and fix it with hairpin following the safety pins. Upper linking rod of tractor allows aligning front and back lines in parallel for the machine attached by being shortened and extended. A gap should be available between round journals in the holes at the side where upper linking rod is connected to both machine and tractor and shafts attached to the said journals!
• Finally complete the attachment of machine to tractor by connecting PTO shaft; clean and grease tail spindle and transmission output shaft of machine. After that, scroll it on PTO shaft until pin fits completely. Sliding gap for shaft should be minimun 5 cm and maximum 15 cm.
• Check the lighting, warning systems and security mechanisms of the machine, intended for the transport on highways and replace the missing and lost ones as well as the ones that lost its function.